
How to Make a Receipt: What to Include + 3 Easy Methods
Learn how to make a receipt that holds up: the 6 things every receipt needs, plus three ways to create one (receipt book, Word/Excel, or free online maker).
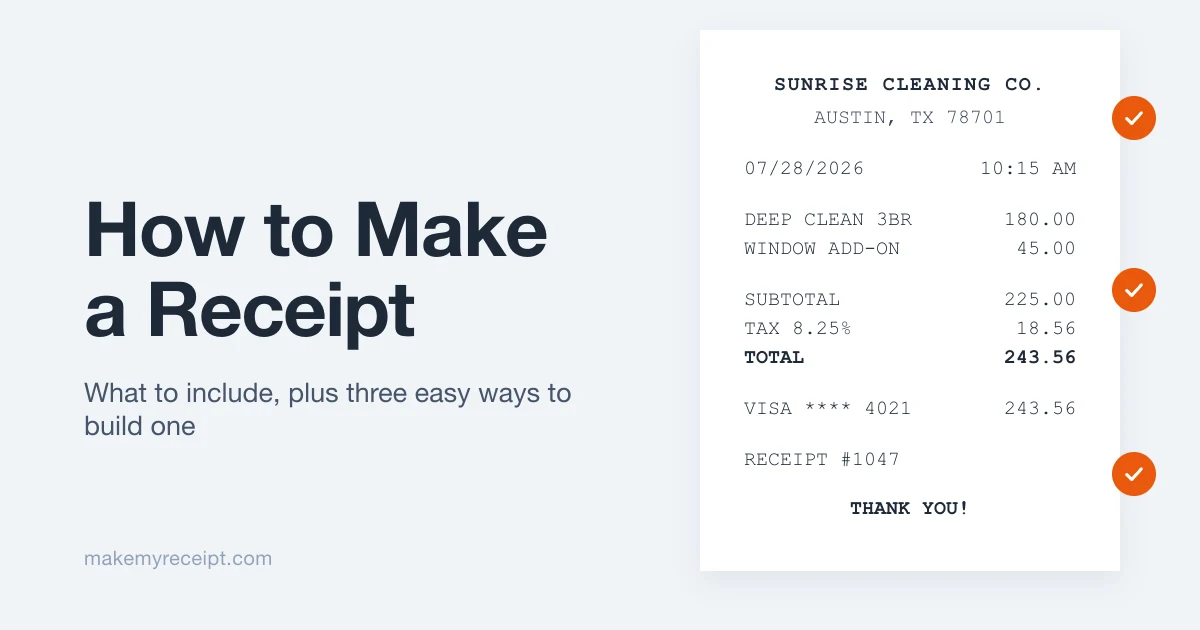
Making a receipt is simpler than most people expect. You need six pieces of information and a way to put them on paper or PDF. That's the whole job.
This guide covers exactly what goes on a receipt, then walks through the three ways to make one: a handwritten receipt book, a Word or Excel template, and a free online receipt maker. By the end you'll know which method fits your situation and how to produce a receipt that customers, accountants, and the IRS will all accept.
What Every Receipt Needs
A receipt has one job: prove that a payment happened. To do that job well, it needs to answer five questions. Who got paid? When? For what? How much? And how was it paid?
Six elements answer those questions, plus one optional extra that saves headaches later.
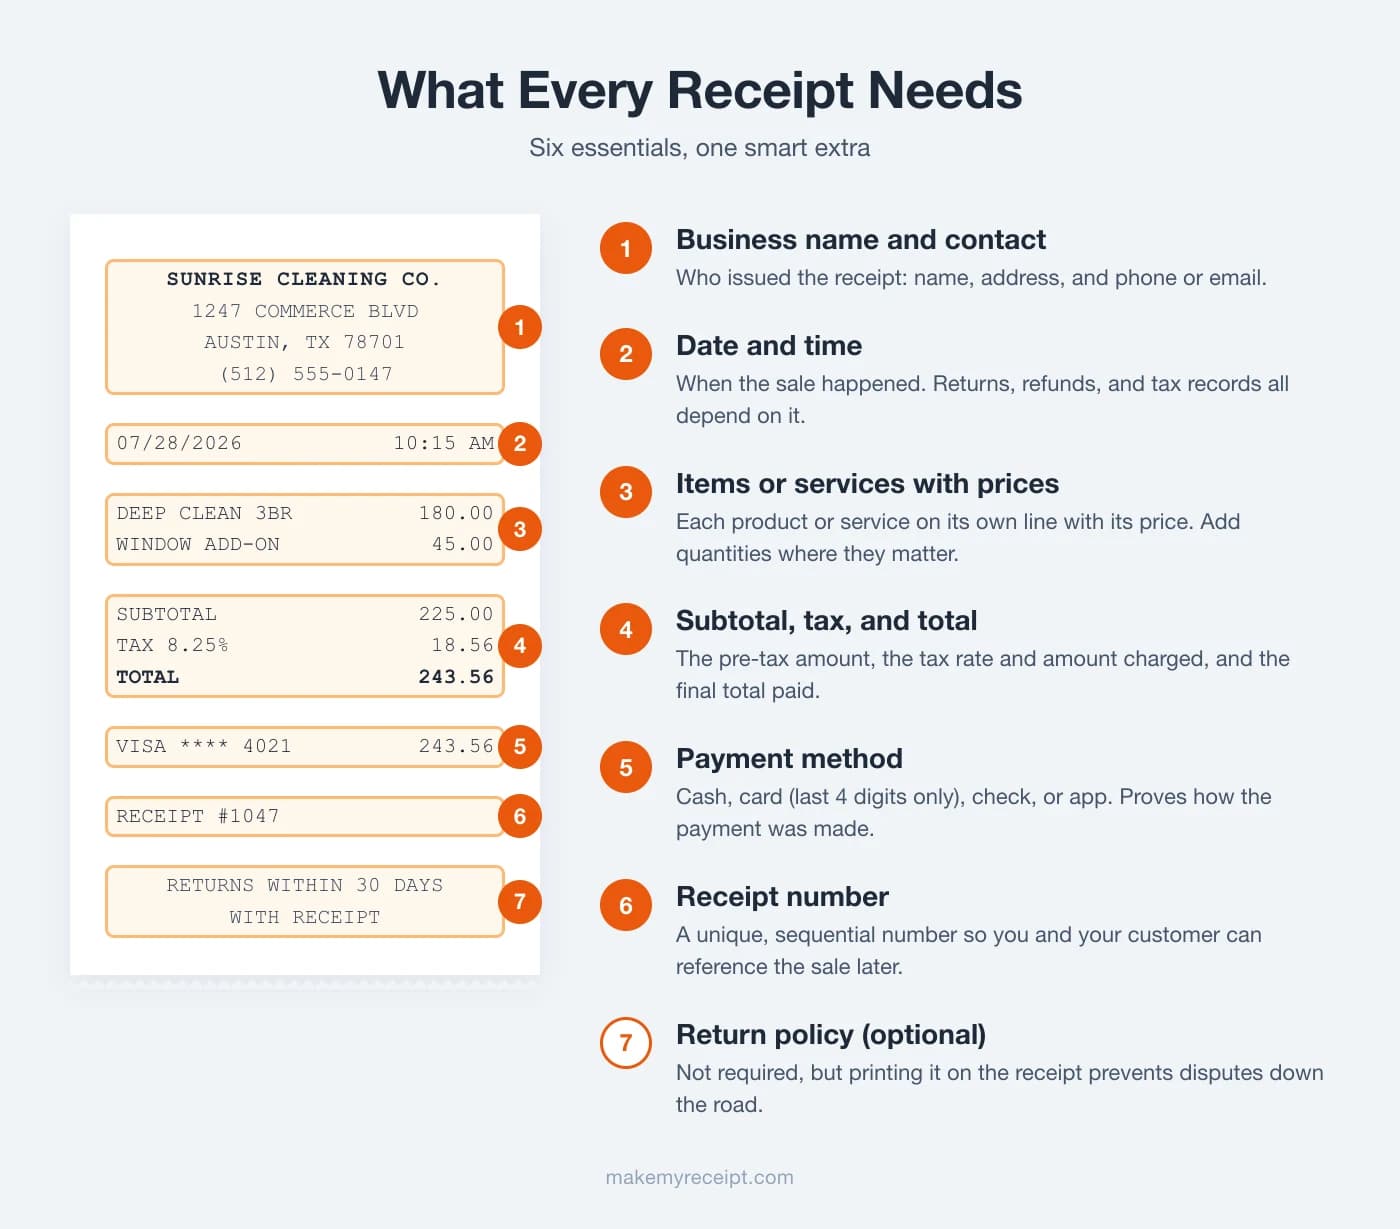
1. Business name and contact details
The receipt should say who issued it: your business name, address, and a phone number or email. If you operate under your own name rather than a business name, use that. A logo is a nice touch but not required.
2. Date and time
Every receipt needs the date of the transaction. The time matters more for retail (returns and card disputes get matched by timestamp), but including it never hurts.
3. Items or services with prices
List each product or service on its own line with its price. Add quantities when you sell more than one of something. For services, a short description works: "Deep clean, 3BR house" tells everyone what the money bought. If you need line-by-line detail for an expense report, see our guide to creating an itemized receipt.
4. Subtotal, tax, and total
Show the pre-tax subtotal, the tax rate and amount you charged, and the final total. If you don't collect sales tax (many small service providers don't need to), skip the tax line and just show the total. Getting this math right is where handwritten receipts most often go wrong, which we'll get to below.
5. Payment method
Note how the customer paid: cash, card, check, or an app like Venmo or Cash App. For card payments, only ever show the last four digits. Never write out a full card number.
6. Receipt number
Give each receipt a unique number and count up from there. When a customer calls three weeks later about a refund, "receipt #1047" finds the sale instantly. Sequential numbering also keeps your own records clean at tax time.
7. Return policy (optional)
Not required, but a one-line policy like "Returns within 30 days with receipt" printed at the bottom prevents most disputes before they start.
One thing a receipt does not need: a signature. Signatures belong on contracts and some card slips. A receipt is valid without one.
If you're not sure whether the document you need is actually a receipt, check the timing. Money already changed hands? Receipt. Requesting payment for later? That's an invoice, and our receipt vs invoice guide explains the difference.
Three Ways to Make a Receipt
Every receipt method is a version of the same task: get those six elements onto something you can hand or send to the customer. The difference is speed, accuracy, and how professional the result looks.
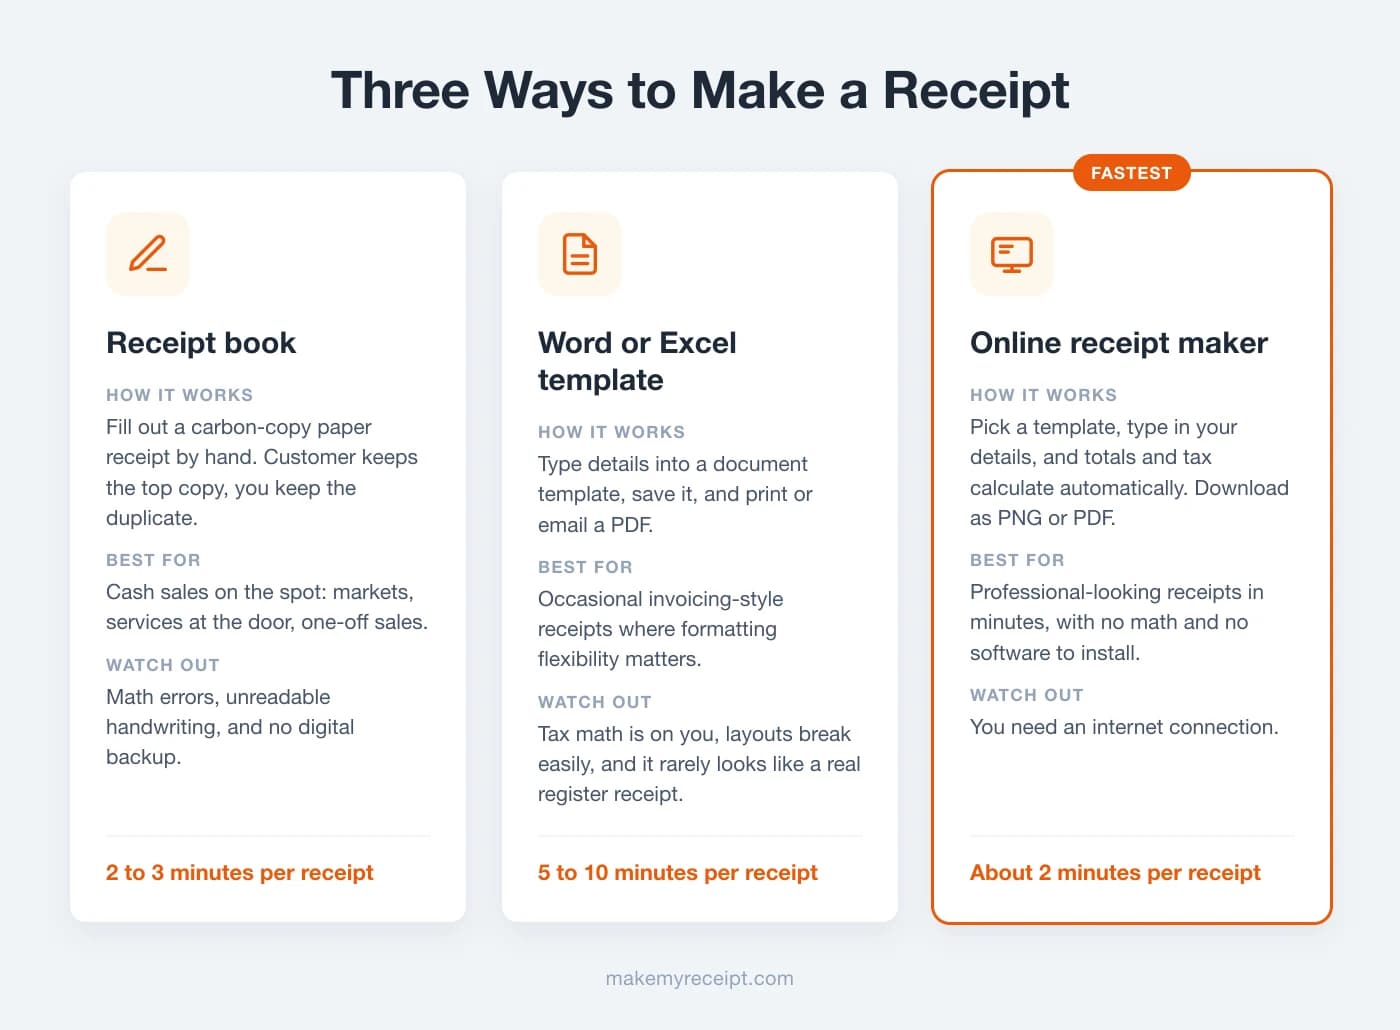
Here's each one in detail.
Method 1: Make a Receipt Online (Fastest)
An online receipt maker handles the formatting and the math so you only supply the details. This is the fastest route to a receipt that looks like it came from a real register or POS system.
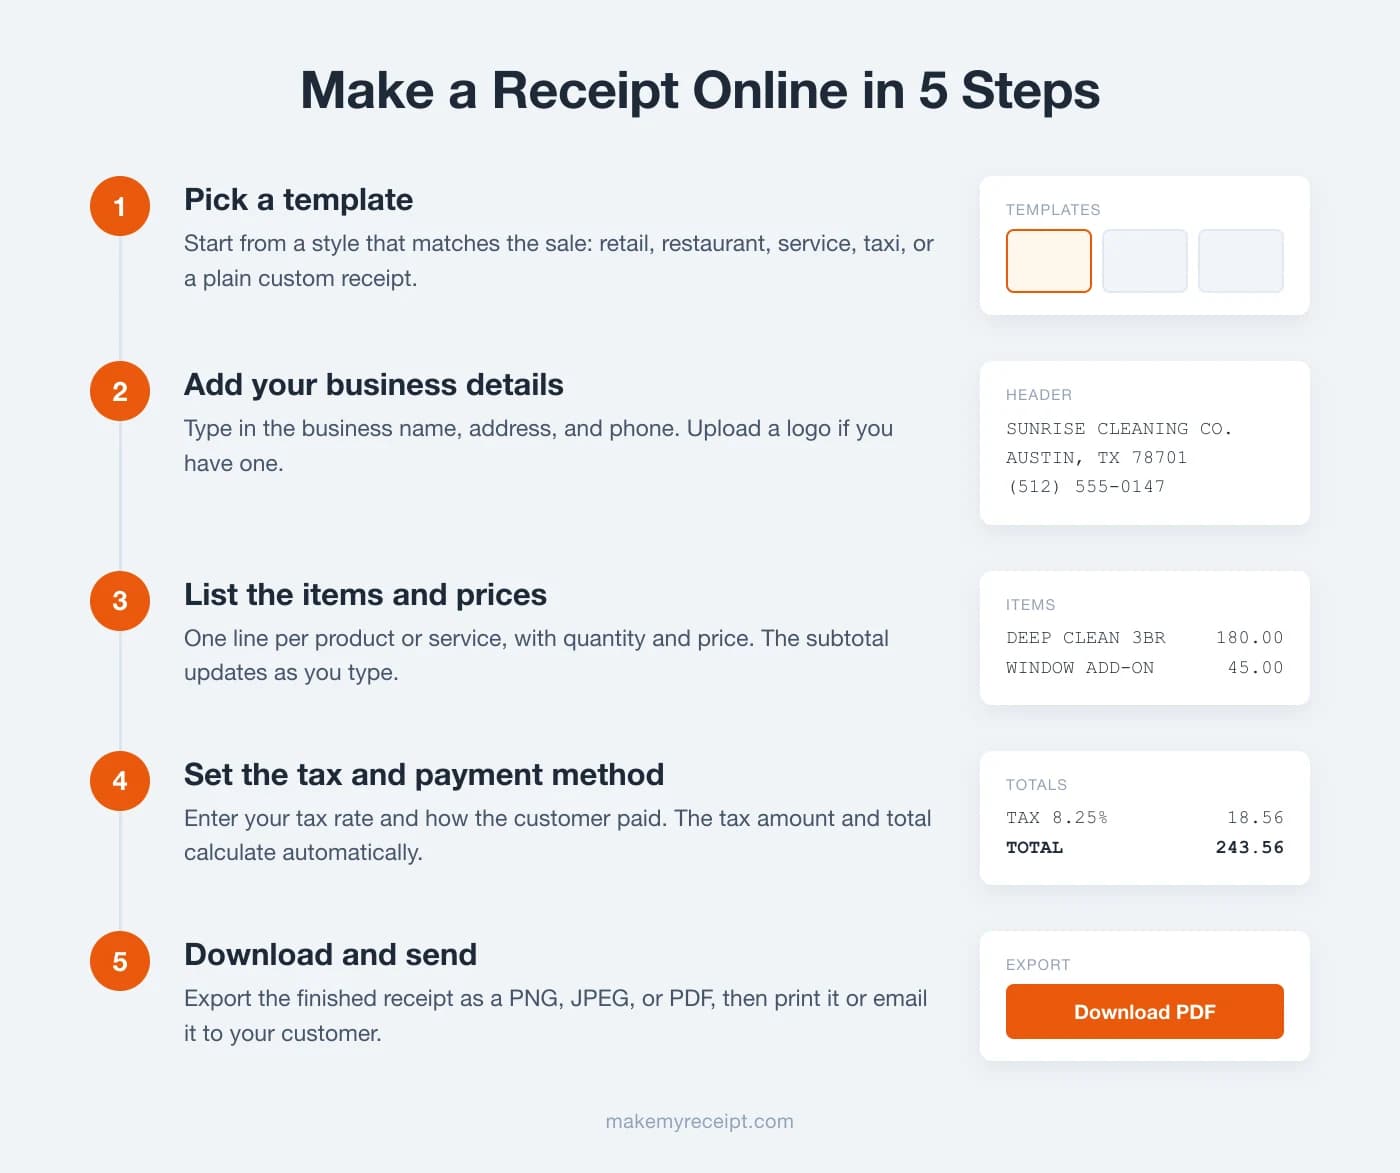
Here's the process in MakeMyReceipt, start to finish:
- Pick a template. Start from a style that matches the sale. There are over 100 templates covering retail stores, restaurants, services, taxis, and more, plus a plain custom receipt if you want a blank slate.
- Add your business details. Type in the business name, address, and phone number. Upload a logo if you have one.
- List the items and prices. One line per product or service, with quantity and price. The subtotal updates as you type.
- Set the tax and payment method. Enter your tax rate and the tax amount calculates automatically. Pick cash, card, or another payment method and the receipt formats it properly, including change due on cash sales.
- Download and send. Export as PNG, JPEG, or PDF, then print it or email it to your customer.
The whole thing takes about two minutes, there's nothing to install, and the math is never wrong. The only real requirement is an internet connection.
This method is the best fit when you want the receipt to look professional, when you issue receipts irregularly (so a POS system would be overkill), or when a customer asks for a copy of a receipt after the fact.
Method 2: Write a Receipt by Hand
The old-school method still works. A carbon-copy receipt book costs a few dollars at any office supply store and needs no electricity, no internet, and no setup.
To write a receipt by hand:
- Fill in your business name and contact info at the top (or use a custom stamp to speed this up).
- Write the date and the receipt number. Most books come pre-numbered.
- List each item or service with its price, one per line.
- Add up the subtotal, calculate the tax, and write the total. Double-check this math. Then check it again.
- Note the payment method. For cash, record the amount received and the change given.
- Sign or initial it if you like, hand the customer the top copy, and keep the carbon duplicate.
Handwritten receipts are completely valid as proof of payment. Their weaknesses are practical: arithmetic mistakes, handwriting the customer can't read later, and no backup if either copy gets lost or fades (paper receipts degrade surprisingly fast, as our receipt management statistics report shows). If you take a lot of cash payments, our cash receipt guide covers the details that matter most, like recording amount tendered and change due.
This method is the best fit for on-the-spot cash sales: market stalls, door-to-door services, garage sales, one-off transactions.
Method 3: Use a Word, Excel, or Google Docs Template
The middle path is a document template. Search the template gallery in Word, Excel, or Google Docs for "receipt," fill in your details, and print or export a PDF.
A few honest caveats from anyone who has tried this route:
- The math is on you. Word templates don't calculate. Excel can, if the template's formulas are set up correctly and you don't accidentally overwrite one.
- Layouts break easily. Add one line item too many and the table splits across two pages or the columns drift out of alignment.
- The result looks like a document. That's fine for a service business where receipts resemble invoices anyway. But it will never look like a store receipt, because register receipts have a distinctive narrow format that word processors aren't built for.
This method is the best fit when you already live in Word or Excel, issue receipts rarely, and want full control over the layout.
Making Receipts for a Business
If you're issuing receipts regularly as a business, a few habits will save you real pain at tax time:
- Keep a copy of everything. Whichever method you use, keep your copy of every receipt. Receipt books give you the carbon copy. Online makers let you download a duplicate, and a Pro account on MakeMyReceipt saves your receipts to the cloud so you can re-download them anytime.
- Number receipts sequentially and never reuse a number. Gaps are fine. Duplicates are not.
- Record enough detail to reconstruct the sale. "Services rendered, $500" tells an accountant nothing. "Lawn care, May 2026, $500" holds up. The IRS cares about amount, date, and business purpose, and our IRS receipt requirements guide covers what records you need to keep and for how long.
- Charge and show tax correctly. If you collect sales tax, the receipt should show the rate and the amount as separate lines, not fold it silently into the price.
- Issue receipts promptly. A receipt created at the time of sale is credible. One reconstructed months later from memory is not, and for expenses, the IRS explicitly favors records made at or near the time of the transaction.
For a starting point, the Business Receipt and Sales Receipt templates cover the standard cases, and every template recalculates totals automatically as you edit. Some situations have their own conventions and even legal requirements; rent is the big one, and our guide on how to write a rent receipt covers the extra fields and state rules.
Common Mistakes to Avoid
These are the errors we see most often on homemade receipts:
- Wrong tax math. The classic. Tax gets calculated on the wrong base, or the lines don't add up to the total. Any discrepancy makes the whole receipt look unreliable.
- No receipt number. Without one, matching a refund request or an accounting entry to the sale becomes guesswork.
- Missing payment method. "Paid" is not enough. Cash and card payments get disputed and reconciled differently.
- Full card numbers. Never put a complete card number on a receipt. Last four digits only.
- Vague descriptions. "Goods: $75" invites questions from customers and auditors alike. Name the thing.
- No copy for your own records. The customer's receipt protects the customer. Your copy protects you.
Frequently Asked Questions
How can I make a receipt for free?
Use a free online receipt maker. Pick a template, type in your business name, items, and tax rate, and download the finished receipt as a PNG, JPEG, or PDF. MakeMyReceipt is free to use and takes about two minutes per receipt. The other free routes are a paper receipt book (a few dollars at any office supply store) or a document template in Word or Google Docs.
Is a handwritten receipt valid?
Yes. There is no rule that says a receipt has to be printed. A handwritten receipt works as proof of payment as long as it includes the essentials: who was paid, the date, what was sold, the amount, and how it was paid. Many small businesses run entirely on carbon-copy receipt books. The practical downsides are math errors, hard-to-read handwriting, and having no digital backup if the paper is lost.
What needs to be included on a receipt?
Six things cover almost every situation: the business name with contact details, the date and time of the sale, each item or service with its price, the subtotal with tax and the final total, the payment method, and a receipt number. A return policy line is optional but helps prevent disputes.
How do I make a receipt without a cash register?
You don't need a register or POS system. The three common routes are a carbon-copy receipt book you fill out by hand, a receipt template in Word or Excel that you print or email, and an online receipt maker that formats everything and does the tax math for you. For occasional sales, the online route is usually the fastest and looks the most professional.
What is the difference between a receipt and an invoice?
Timing. An invoice is a request for payment sent before money changes hands, and it lists what is owed. A receipt is proof of payment issued after the customer has paid. Our receipt vs invoice comparison breaks down when to use each.
How should I number receipts?
Use a simple sequential system and never repeat a number. Many small businesses start at 1001 rather than 1 and count up. If you issue a lot of receipts, a date-based pattern like 2026-0148 keeps things sorted by year. The exact format matters less than consistency: unique numbers make it easy to match a customer question or a refund to the original sale.
Can a receipt be digital, or does it have to be printed?
Digital is fine. An emailed PDF or an image of a receipt is proof of payment just like a paper copy, and the IRS accepts digital records for tax purposes. Keep a copy of every receipt you issue, whichever format you use.
How do I write a receipt for a cash payment?
Record the same essentials as any receipt, and add the amount received and change given, since cash leaves no bank trail. Write the amount tendered (say, $60.00), the total ($54.13), and the change ($5.87). Both sides should keep a copy. Our cash receipt guide walks through this line by line.
Make Your First Receipt Now
You now know everything a receipt needs: six essential elements, honest math, and a copy for your own records. The only remaining question is which method fits your situation.
If the answer is "the fast one," open the free receipt maker, pick a template, and you'll have a finished, professional receipt downloaded in about two minutes. No signup required to build and preview your receipt.
Ready to create your receipt?
Try our free receipt maker with customizable templates.
Open Receipt Builder